 Documentation
Installation
Requirements
ilastik binaries are provided for Windows, Linux, and Mac at our download page.
Note: ilastik requires a 64-bit machine. We do not provide 32-bit binaries.
We recommend using ilastik only on systems with at least 8 GB of RAM. For using the Autocontext Workflow —our most memory-intensive workflow— on large 3D data your system should have at least 32 GB of RAM for smooth interaction.
From 1.4.0b20 on we distribute ilastik with additional GPU-enabled builds for Windows and Linux. With these you can run pre-trained neural network models from the bioimage.io Model Zoo faster, if you have a compatible nvidia GPU on your system. All other workflows, besides the Neural Network Workflow (local) will work exactly like before.
If you are interested in running ilastik on a remote GPU, e.g. if you have a powerful server in your facility, you have to check for additional installation instructions for the server part in the tiktorch repository. After you install the server part, you can use your regular ilastik installation as a client with the Neural Network Workflow (remote), ilastik will take care of the communication with the server.
On Mac, Linux, and Windows learning the weights in the Tracking with Learning Workflow requires a commercial solver (CPLEX or Gurobi). In order to enable this the Tracking with Leaning Workflow, please follow the instructions in the section about commercial solver installation.
Basic Installation
Installation on Windows
Download the Windows self-extracting installer and run it. The installer will guide you through the installation process. You can find an entry for ilastik in the start menu and click it to launch the program.
Installation on Mac
Download the .tar.bz2 file for your version of OSX and extract its contents with a simple double-click.
Copy ilastik.app to the folder of your choice (usually your Applications folder), Control-click the app icon and choose “Open” to begin (for more info, see https://support.apple.com/guide/mac-help/open-a-mac-app-from-an-unidentified-developer-mh40616/mac).
Installation on Linux
Download the Linux .tar.bz2 bundle and extract its contents from the terminal:
tar xjf ilastik-1.*-Linux.tar.bz2
To run ilastik, use the included run_ilastik.sh script:
cd ilastik-1.*-Linux
./run_ilastik.sh
Controlling CPU and RAM resources
By default, ilastik will use all available CPU cores (as detected by Python’s “multiprocessing” module), including “virtual” cores if your CPU supports hyperthreading (like most modern Intel processors).
If you want to explicitly specify the number of parallel threads ilastik should use, you can do so either by
- setting special environment variables, or
- creating a configuration file for ilastik.
Using environment variables to control resources
ilastik will check for two environment variables on startup that control resource usage: LAZYFLOW_THREADS, and LAZYFLOW_TOTAL_RAM_MB.
Note, these environment variables overrule any settings made in a config file (see below).
On linux and OSX you can specify the environment variables when starting ilastik from the command line:
LAZYFLOW_THREADS=4 run_ilastik.sh [...options]
There’s an additional environment variable for specifying how much RAM to use during headless execution:
LAZYFLOW_THREADS=4 LAZYFLOW_TOTAL_RAM_MB=4000 run_ilastik.sh [...options]
The RAM limit is not perfectly respected in all cases, so you may want to leave some buffer if your RAM budget is strict.
Using a configuration file to control resources
ilastik will check on each startup whether it can find its configuration file .ilastikrc in the home folder.
In order to control RAM and CPU resources, use a text-editor to create the file at
C:\Users\<YourUserName>\.ilastikrcon windows,/Users/<YourUserName>/.ilastikrcon OSX, and/home/<YourUserName>/.ilastikrcon linux.
In order to limit ilastik to use 4000 megabytes of RAM and 4 threads, the file should have the following content:
[lazyflow]
total_ram_mb=4000
threads=4
Commercial Solver Installation
In order to learn the tracking parameters in the Tracking With Learning Workflow, installation of a commercial solver is required.
History of supported solver versions
| ilastik version | GUROBI version | CPLEX version |
|---|---|---|
| 1.4.1 | 12.0.0 | not supported |
| 1.4.0 | 9.5.1 | not supported |
| 1.3.3 | 8.1.1 | 1290 |
| 1.3.2 | 8.0.1 | 1280 |
| 1.3.0 | 7.5.2 | 1260 |
We’ll go through the installation in the following sections.
For instructions on installing CPLEX in one of the old ilastik versions, please see our legacy installation instructions.
GUROBI Installation and Setup
Application for a free Academic License at GUROBI
Application for an academic license is available after registration with your institution email address at the GUROBI website. Details can be found here. The easiest way is to obtain a free named-user academic license. Instructions are provided on this page. At the end of the process, you will be provided with your license key. Note that this license is only valid for a limited amount of time (currently this period is two months, but this could be subject to change). You will need the license key to activate your GUROBI installation.
Download the appropriate package for your operating system from the GUROBI download page. Visit our download-page to find information about compatibility of the different GUROBI versions with ilastik.
The following sections contain platform-specific instructions for GUROBI installation on Windows as well as on Linux and MacOSX.
Installation on Windows
Double click the Gurobi-12.0.0-win64.msi installer to go through the installation process.
Restart your computer to complete the installation.
Once the installation is complete, you need to activate the license.
You can review all your current licenses here.
Licenses without an entry in the Host Name column have not been assigned a computer yet.
Click on one of those to get to a new page with instructions.
On the bottom of this page you will find a line like:
grbgetkey aaaaaaaa-bbbb-cccc-dddd-eeeeeeeeeeee
copy the whole line and paste it into the windows search bar and click on run command in the search bar.
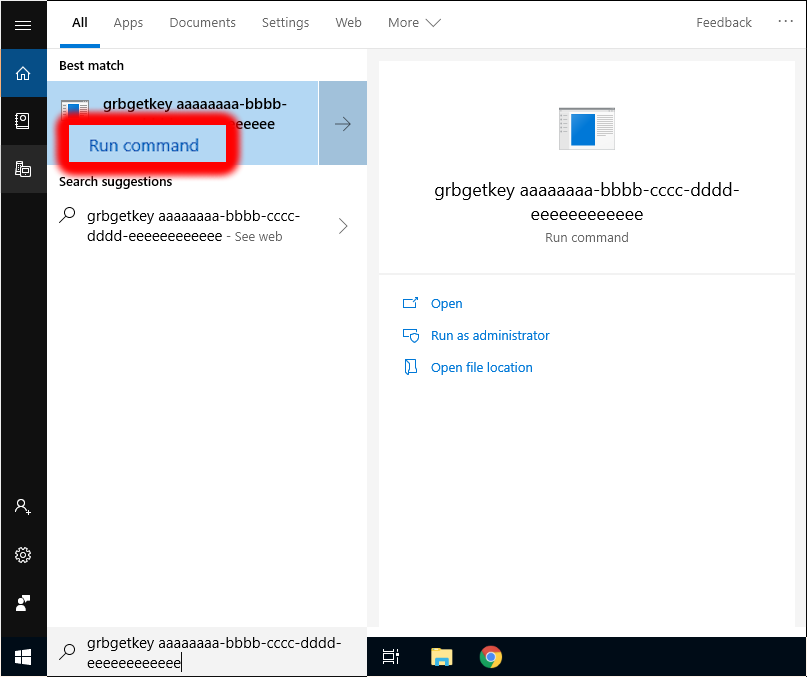
This will pop up a terminal window and ask you for the location to store the license. The default location is usually fine - press enter to finish the process.
With that you should be able to use the “Calculate Tracking Weights” functionality in [Tracking with Learning][tracking-with-learning].
In case of problems, please take a look at the GUROBI installation documentation.
Note: Due to a bug in ilastik 1.3.3 the solver library is not recognized.
If you absolutely have to use this version then a solution is to manually copy C:\gurobi811\win64\bin\gurobi811.dll to your ilastik installation folder, e.g. C:\Program Files\ilastik-1.3.3\Library\bin.
Installation on MacOSX and Linux
On MacOSX you can start the installation process by clicking on the downloaded file gurobi12.0.0_macos_universal2.pkg.
Note: on MacOSX, starting from ilastik 1.4.1, gurobi will only be found if it is installed into the /Libary/gurobi1200/ directory (default).
On linux you have to unpack the downloaded archive:
tar -xvf gurobi12.0.0_linux64.tar.gz -C /your/target/directory
Activate your installation by invoking grbgetkey with your license.
You can review all your current licenses here.
Licenses without an entry in the Host Name column have not been assigned a computer yet.
Click on one of those to get to a new page with instructions.
On the bottom of this page you will find a line like:
grbgetkey aaaaaaaa-bbbb-cccc-dddd-eeeeeeeeeeee
For the activation you’ll have to open a terminal and follow this sequence of commands:
# Linux
cd /your/target/directory/gurobi1200/linux64/bin
# OSX
# on OSX gurobi is installed to /Library/ per default.
cd /Libary/gurobi1200/macos_universal2/bin

 # use the obtained license key here
./grbgetkey aaaaaaaa-bbbb-cccc-dddd-eeeeeeeeeeee
# Follow the instructions and take note of the license path.
In the next step you have to execute a script that will link your GUROBI libraries to your ilastik installation. In a terminal, download the script for linking gurobi to the ilastik installation:
Linking the gurobi libaries to the ilastik binary
This section only applies to Linux. On MacOSX using ilastik 1.4.1 or newer, the gurobi solver will be found if it is installed into the default location.
# set-up environment, only necessary if gurobi.lic is not in the home folder
export GRB_LICENSE_FILE=/path/to/license/gurobi.lic

# Linux
wget https://raw.githubusercontent.com/ilastik/ilastik/main/scripts/install-gurobi-symlinks.sh

# Mac
curl -O https://raw.githubusercontent.com/ilastik/ilastik/main/scripts/install-gurobi-symlinks.sh

# once the download is finished, make the script executable
chmod +x install-gurobi-symlinks.sh

# link the installed gurobi libraries to the ilastik installation
# Linux
bash install-gurobi-symlinks.sh /your/target/directoy/gurobi1200/linux64 /path/to/ilastik-1.*-Linux
# Mac
bash install-gurobi-symlinks.sh /your/target/directoy/gurobi1200/macos_universal2/ /path/to/ilastik-1.*-OSX.app
After a successful installation, learning the weights in the Tracking with Learning Workflow will be enabled.
In order to run ilastik with GUROBI support, make sure to always set the path to the license file (in case of a non-standard location):
# set-up environment, only necessary if gurobi.lic is not in the home folder
export GRB_LICENSE_FILE=/path/to/license/gurobi.lic

# run ilastik
cd /path/to/ilastik-1.*-Linux
./run_ilastik.sh
Should you run into any problems, please contact us.