 Documentation
Data Selection Applet
The first step in any ilastik workflow is to load the data into the project. ilastik supports importing data in various formats, from a single file or a stack of files which form a new dimension.
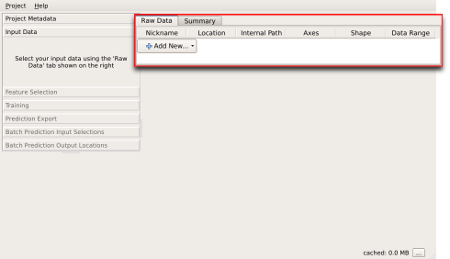
After creating a new project, you will be presented with the main ilastik window. The left panel of this window is populated with steps of the workflow and the overlay selection box. The right panel contains different data views based on the active workflow step selected on the left.
Data can be added to a project in the “Input Data” step visible on the left panel. When this step is active, the data selection box on the right panel can be used to import new data files or modify properties of selected files.
New data can be imported in a project with the “Add New…” button. Clicking this will present two options,
- Add separate image(s)…
- Add a single 3D/4D Volume from Stack…
- Add multiscale dataset…
These can be used to load a 2D/3D/4D image from a single file or load a single 2D/3D/4D image from a stack of 2D images respectively.
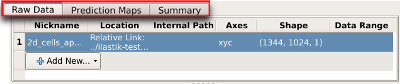
Some workflows require matching datasets that correspond to an input. For example, the object classification from prediction maps workflow needs a separate file to specify the background pixels in the input data. In this case, tabs visible at the top of the data selection box can be used to import additional data corresponding to an input.
Loading data from a single file
You can use the “Add separate image(s)…” option to add new data files to a project. This will present a standard file open dialog, where the desired input file can be selected. This dialog also allows selecting multiple files. Note that multiple files will be added as if the dialog was used once for each of these. See the following section for instructions on how to interpret multiple files as a new dimension in the data.
Loading image stacks
If one dimension of the data is separated into different files, such as a stack of 2D images to form a 3D image or a sequence of 2D images for each frame in a movie, this option can be used to form a new dimension based on a list of files.
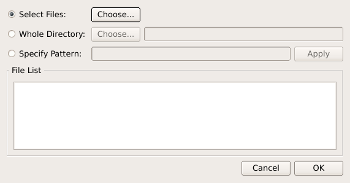
Selecting this option will open a new dialog to select the files that will be included in the stack. The selection can be specified in three ways:
- selecting multiple files using the standard system file open dialog,
- selecting all files in a directory
- using a filename pattern (with Unix style patterns)
A special case are image stacks saved in multiple .h5 files (HDF5, see paragraph
Supported File Formats). HDF5 supports saving multiple datasets
encapsulated in a single file which can be accessed using internal paths,
similar to paths in a file system. For instance, you could have a folder with
multiple files, file_001.h5, file_002.h5, ..., containing data that can be
composed into a single image volume. In order to assemble the images an
internal path to the image data in each file has to be specified.
Ilastik assumes that data with similar internal paths should be stacked and will
try to determine a common internal path in the selected .h5 files.
In case of multiple common internal paths the user is asked to select the
appropriate one.
So, if the image data is found in file_*.h5/data/imagedata in each of the
files, ilastik will automatically choose data/imagedata.
In case of multiple datasets per file, e.g. the files might contain data
collected from multiple subjects at internal paths like
file_*.h5/images/subject1, file_*.h5/images/subject2, ..., ilastik will ask
which of those sub-images should be selected for stacking.
Once a selection has been made, the File List box can be used to review
the names of the files that will be imported as an image stack.
Note: Data that is loaded from image stacks (multiple files) will be copied to the project file (.ilp).
This ensures faster computations and enables processing of stacks larger than RAM by converting the data to chunked hdf5.
Loading multiscale data
Starting in version 1.4.1, multiscale datasets are supported in the formats OME-Zarr (URLs containing .zarr) and Neuroglancer Precomputed (URLs starting with precomputed://).
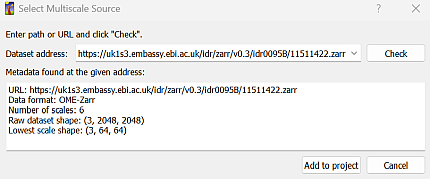
You can use “Add multiscale dataset” to load multiscale, a.k.a. pyramidal images.
The dialog will ask for an address.
This must be a full URL including protocol.
When you click “Check”, ilastik will try to obtain image metadata from the given address, and display the results of the request.
If the dataset is stored on the local filesystem, you can paste the path into the address field, e.g. C:\Users\me\Downloads\tissue-gfp.zarr.
The “Check” button will test whether the path exists on the filesystem and automatically convert it to a file:/// URL if successful.
Note that the URL has to contain “.zarr”, or for Neuroglancer Precomputed it has to include the “precomputed://” prefix.
Some tools unfortunately nest the actual multiscale image inside a folder named with the “.zarr” suffix.
If ilastik cannot find any dataset at the “.zarr” level, you may need to inspect the folder yourself and try the subfolders inside it.
Accessing OME-Zarr datasets with authentication
Datasets stored on Amazon Web Service’s S3, or on S3-like servers, can be accessed in ilastik with authentication.
If the dataset is publicly accessible, simply pasting the https:// or s3:// URL should be sufficient.
When anonymous/public access fails, ilastik automatically tries authenticated access.
For this to work, your credentials must be set up before you start ilastik.
Changes to credentials while ilastik is running will not be picked up.
For authentication, ilastik uses the module s3fs, which builds on Amazon’s boto.
You can find instructions on how to set up credentials in the boto documentation.
We recommend following the “shared credential file” approach.
If authentication via shared credential file does not work, you can try using environment variables as described in the boto reference if you are trying to access an AWS S3 server.
If you are trying to access an S3-like server (but not AWS), s3fs additionally supports authentication via environment variables named FSSPEC_..., see the s3fs docs.
If the connection fails, the error messages in ilastik should indicate whether the problem is with access/authentication, or something else.
If you cannot access your dataset from ilastik, but you are able to access it from other tools, please report this to us (Help > Report issue).
Browsing and working with multiscale datasets
To inspect more than one scale at a time, you can add multiple instances of the same dataset using “Add New”. Simply paste the same address again, click “Check”, and then “Add to project”.
When navigating the dataset, remember that downloading the image data can take some time. It is recommended to use the lowest resolution possible for exploration. At larger resolutions, zoom in to the area of interest, as suggested in the performance tips section. This way, ilastik can avoid loading data outside the viewer area.
Once you continue to the next step in the workflow, your choice of scale will be locked for all multiscale entries in the table. This is because ilastik can currently not handle changing pixel dimensions once a dataset is loaded into the workflow beyond “Input Data”. If you want to inspect a different scale later, you can use “Add new” and paste the same address again.
Supported File Formats
The main file formats used by ilastik are HDF5 and N5. Files with extensions h5, hdf5, ilp (ilastik project files) will be recognized as HDF5, folders with a attributes.json file will be recognized as N5.
Widely used image formats such as
- Microsoft Windows bitmap image file (
bmp), - OpenEXR high dynamic range image format (
exr) (requireslibopenexrsupport in VIGRA) , - CompuServe graphics interchange format; 8-bit color (
gif), - Joint Photographic Experts Group JFIF format; compressed 24-bit color (
jpegorjpg) (requireslibjpegsupport in VIGRA) - Tagged Image File Format (
tifortiff) (requireslibtiffsupport in VIGRA) - SUN Rasterfile (
ras) - Portable Network Graphic (
png) (requireslibpngsupport in VIGRA) - Portable bitmap format (black and white) (
pbm) - Portable graymap format (gray scale) (
pgm) - Portable pixmap format (color) (
ppm) - Portable anymap (
pnm) - Radiance RGBE high dynamic range image format (
hdr) - Khoros Visualization image file (
xv)
can be imported directly into a project, as well as NumPy binary array
files with extension npy.
The multiscale image formats
- OME-Zarr (URLs containing
.zarr), i.e. Zarr stores compliant with Open Microscopy Environment’s next-generation file format specification - Neuroglancer Precomputed (URLs starting with
precomputed://)
can be imported into projects using the “Add multiscale dataset” option, more detail in the multiscale section.
Dataset Properties Editor
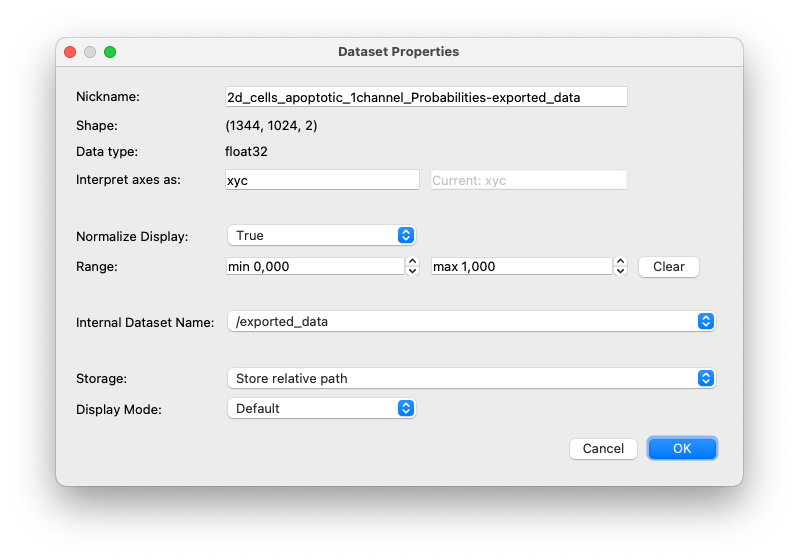
You can review and/or change the way ilastik interprets your dataset using the Dataset Properties Editor. For example, to specify that a stack of images should be interpreted as having a t-axis (for time) instead of a z-axis, use this editor. To open the editor, double-click an item in the dataset list or right-click the item and select “Edit Properties”. Read on for a description of each field in this window.
- Nickname: short name used to identify the data
- Shape: specifies the sizes of each dimension
- Data type: data type used to interpret the binary data in the file. This is selected automatically based on the file type.
- Interpret axes as: Axes tags indicating how each dimension should be interpreted.
The letters
tandccorrespond to time and color dimensions respectively. ilastik differentiates 2D + time data from 3D data, computing temporal features for the former. Marking a dimension as time changes ilastik behavior. - Normalize Display: If you would like your data to be displayed with a contrast adjustment using the minimum and maximum pixel values, set this to ‘True’.
- Range: If you know your data’s minimum and maximum pixel values, you can use this field to help ilastik interpret and display your data.
- Internal Dataset Name: Several volumes may exist within a single HDF5/N5 file. Use this field to choose which internal volume ilastik should load from your file.
- Storage: Specifies how ilastik should locate your data the next time your project is opened.
- Absolute Link: Your data always resides in the same place on disk, even if you moved your project file since it was last opened.
- Relative Link: Your data is in the same parent directory tree as your project file. You may move your project file and data files simultaneously, but their relative locations must be fixed.
- Copied to Project File: If you select this, your data will be copied to the project file the next time your project is saved. Pro: Your project file will always be valid, even if you move your data. Con: This creates a copy of your data.
- Display Mode: If your raw data has multiple channels, use this setting to tell ilastik whether it should be displayed as a composite RGB image or as separate grayscale channels.